Supply House Times logo Supply House Times
search
cart
facebook instagram twitter linkedin youtube
  • Sign In
  • Create Account
  • Sign Out
  • My Account
Supply House Times logo Supply House Times
  • NEWS
    • ASA NEWS
    • Company News
  • PRODUCTS
    • Interactive Spotlights
  • COLUMNS
    • Natalie Forster: From the Editor
    • Alicia Branham: Marketing Matters
    • Brad Williams: Succession Planning
    • Melissa Rasico: Luxury Plumbing Lounge
    • Letter from ASA President
    • Guest Columnists
    • Safety Columnists
  • MARKETS
    • Codes & Legislation
    • Heating & Cooling
    • Industrial PVF
    • Plumbing
    • Radiant & Hydronics
    • Solar Thermal | Geothermal
    • Technology
    • Women in Industry
  • BATH & KITCHEN PRO
    • Bath & Kitchen News
    • Bath & Kitchen Products
  • SPECIAL EDITIONS
    • B.I.G. Book Directory
    • Premier 150
    • Rep Locator Directory
  • MEDIA
    • Podcasts
    • Videos
    • eBooks
    • Webinars
  • RESOURCES
    • Radiant Comfort Report
    • Industry Calendar
    • Industry Links
    • Custom Content & Marketing Services
    • Market Research
    • Supply House Times Store
  • EMAG
    • EMAGAZINE
    • ARCHIVE ISSUES
    • CONTACT
    • ADVERTISE
  • SIGN UP!
Radiant Comfort ReportRadiant & Hydronics

Installation guidelines for wet underfloor heating

This radiant form of heating draws cold air across the floor, heats it, then moves it up toward the ceiling.

By Robert Tuffin
When installing underfloor heating

When installing underfloor heating, be sure to refer to the design plan drawings before beginning. All photos courtesy of Ambiente Underfloor Heating Systems UK

For screeded floors

For screeded floors, lay the damp-proof membrane over entire floor area, overlapping at least 150mm up walls and where damp-proof membrane sheets meet. All photos courtesy of Ambiente Underfloor Heating Systems UK

Use pipe clips to secure the tail pipework

Use pipe clips to secure the tail pipework as it crosses the batten/joist. All photos courtesy of Ambiente Underfloor Heating Systems UK

When laying the pipe out

When laying the pipe out, navigate the most efficient route between the manifold and the zone. All photos courtesy of Ambiente Underfloor Heating Systems UK

Once all loops are installed

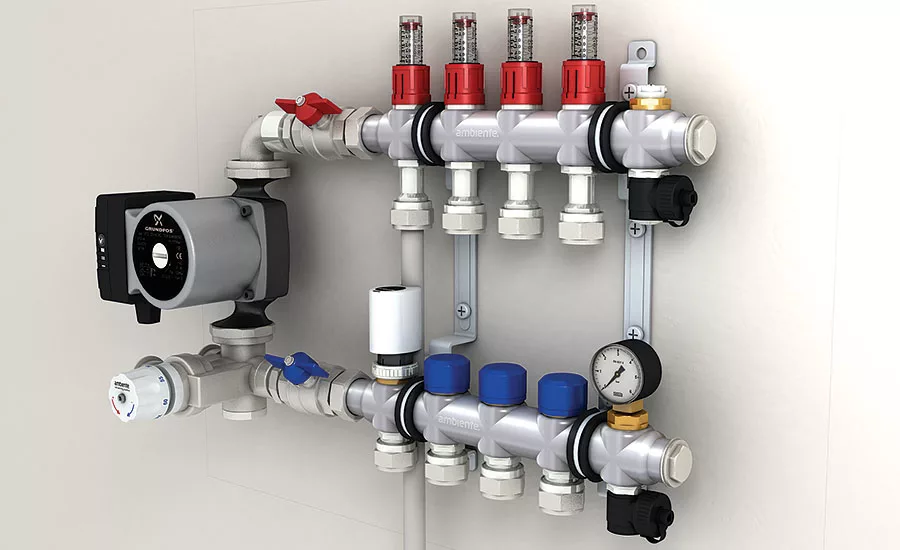
Once all loops are installed and connected to the radiant manifold, the system should be pressure-tested. All photos courtesy of Ambiente Underfloor Heating Systems UK

Labeling system loops help make the system

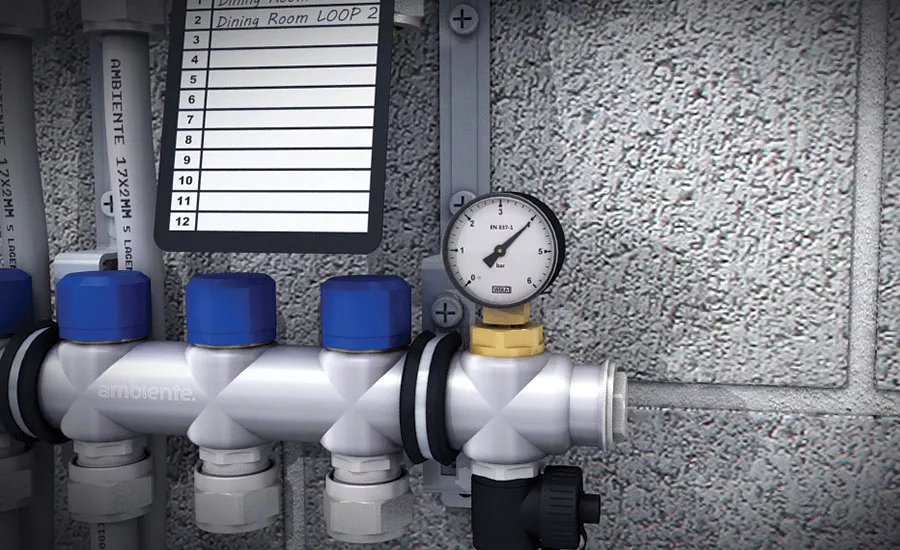
Labeling system loops help make the system easy to trace and troubleshoot. All photos courtesy of Ambiente Underfloor Heating Systems UK

Individual cliprail clips

Individual cliprail clips can be used to hold the pipe to the insulation in between the cliprail and on tight bends. All photos courtesy of Ambiente Underfloor Heating Systems UK

When installing underfloor heating
For screeded floors
Use pipe clips to secure the tail pipework
When laying the pipe out
Once all loops are installed
Labeling system loops help make the system
Individual cliprail clips
July 31, 2018

Wet (or hydronic) underfloor heating works by circulating warm water through a series of continuous loops that are fitted underneath the floor. This creates a large radiant surface that heats a room from the floor upwards.

This radiant form of heating draws cold air across the floor, heats it, then moves it up toward the ceiling. It is much more comfortable than the convective heat provided by radiators.

The following are general guidelines for installation of wet underfloor heating systems, depending on floor construction.


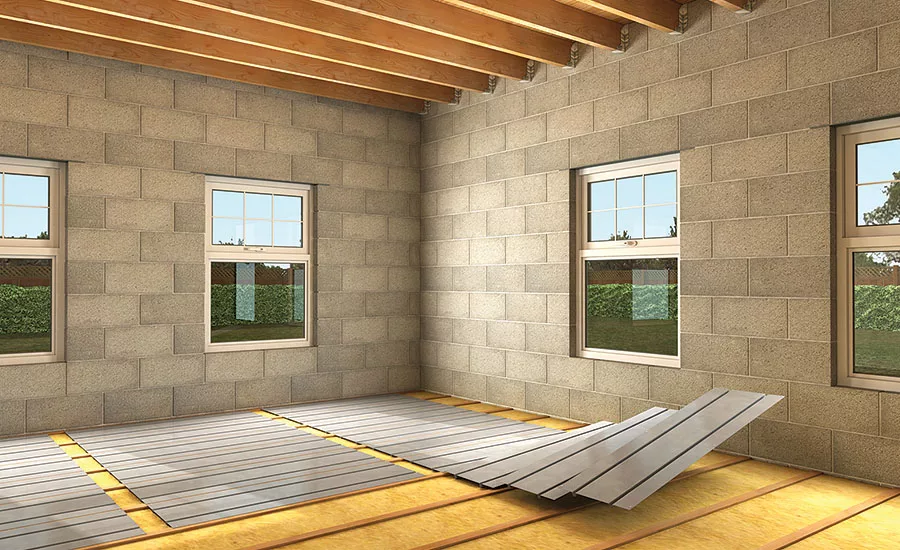
Joisted floors and most timber floors with joists or battens

For joisted floors and most timber floors with joists or battens, follow these installation guidelines:

  • Refer to the design plan drawings. Prepare to lay the floor in accordance with the layout described.

  • Lay the insulation between battens/joists followed by the grooved diffuser plate. Check the system plans for the number and length of each loop required.

  • Starting on the left side of the manifold, connect to the manifold flow bar.

  • Make a note of which zone the loop serves on the manifold tag supplied.

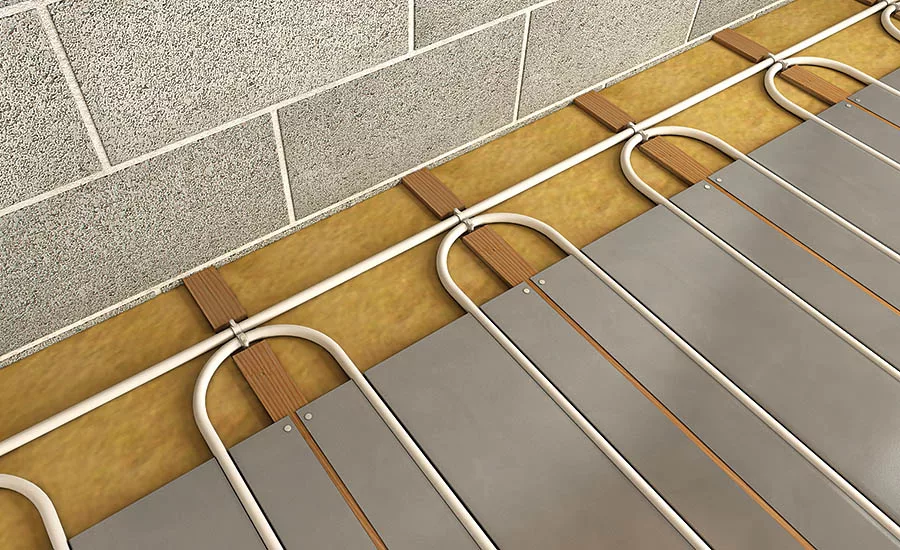
  • Lay the pipe out, navigating the most efficient route between the manifold and the zone. Pipes will need to be notched into the batten/joist when they loop from one joist void to another

  • Secure aluminum diffuser plate to the batten/joist. Lay pipe into the pre-grooved aluminum diffuser plates, as per the system designs.

  • Use pipe clips to secure the tail pipework as it crosses the batten/joist.

  • Complete the loop. Follow the same route back to the manifold and connect to the return bar (bottom bar with blue caps), making a clear note of the actual loop length installed on the manifold tag.

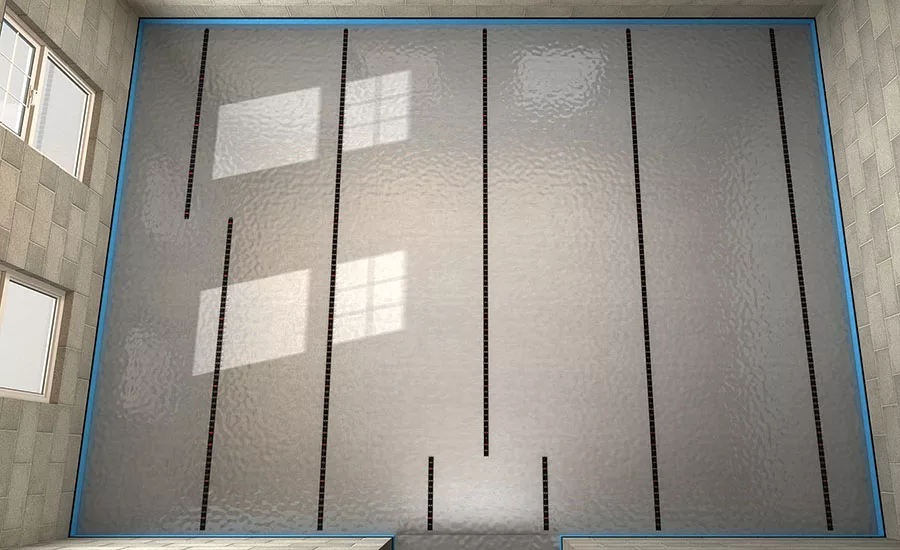
  • Follow the same procedure for all loops until the area is evenly covered with pipe, following your pipe layout design.

  • Test. Once all loops are installed and connected to the manifold, pressure-test the system.

  • Lay final floor finish after the system has been successfully pressure-tested.


Screeded floor build-up

For screeded floors, follow these installation guidelines:

  • Set up the pipe decoiler and all necessary tools. Make sure the working area is clear and clean.

  • Lay the damp-proof membrane over entire floor area, overlapping at least 150mm up walls and where damp-proof-membrane sheets meet.

  • Roll out border edge insulation and lay floor insulation. This will help to hold the border edge in place until screeding. If the floor insulation is already in place, border edging can be stapled to the edges of the floor insulation using cliprail clips or a staple gun to fix to the wall. If required, lay polythene sheets across screeded area overlapping at least 150mm up walls and where sheets meet.

  • Lay cliprail lengths at 1- to 1.2-meter intervals and as detailed on the pipe layout instructions. Use the cliprail clips to secure the cliprail to the insulation (two or three clips per rail).

  • Lay the cliprail lengths at approximately 1-meter intervals and at right angles to the direction the pipe is to be laid.

  • Check the system plans to see the number and length of each loop required.

  • Starting on one side of the manifold, connect to the manifold flow bar. Make a note of which zone the loop serves on the manifold tag supplied.

  • Lay the pipe out, navigating the most efficient route between the manifold and the zone. Start laying the pipe into the cliprail, as per the system designs. Note: Individual cliprail clips can be used to hold the pipe to the insulation in between the cliprails and on tight bends.

  • Complete the loop. Follow the same route back to the manifold and connect to the return bar (bottom bar with blue caps), making a clear note of the actual loop length installed on the manifold tag.

  • Follow the same procedure for all loops until the area is evenly covered with pipe.

  • Screed the floor once the installation of pipework is complete and the system has been pressure tested.


Additional tips

Once installed, make sure you pressure test the system. Also, be sure to mark pipes every meter to help you calculate loop lengths. Some suppliers offer pre-marked solutions.

This article was originally posted on www.pmmag.com.
KEYWORDS: floor warming hydronic heating radiant flooring radiant heating

Share This Story

Looking for a reprint of this article?
From high-res PDFs to custom plaques, order your copy today!

Robert Tuffin is general manager at Ambiente Underfloor Heating Systems UK and has been working in the underfloor heating industry since 2012. He can be reached at robert@ambienteufh.co.uk.

Recommended Content

JOIN TODAY
to unlock your recommendations.

Already have an account? Sign In

  • Stock financial index show successful investment on property business and construction industry with graph and chart for presentation and report background.

    2025 predictions: Twelve trends supply houses should know

    As 2024 ends, I’ll review last year’s predictions and...
    PHCP and PVF Technology & Operations
    By: Brad Williams
  • Background of aerial view of Industrial container port part of shipping in nighttime with a blue overlay.

    2025 Next Gen ALL-STARS: Top 20 Under 40 PHCP-PVF Professionals

    The future of the PHCP-PVF industry is being shaped by a...
    Heating & Cooling
    By: Natalie Forster
  • Premier 150: The top PHCP-PVF Distributors of 2026

    Premier 150: The Top PHCP-PVF Distributors of 2026

    Combined revenue across this year’s Premier 150 once...
    Industrial PVF
    By: Natalie Forster
Manage My Account
  • eMagazine
  • Newsletters
  • Manage My Preferences
  • Online Registration
  • Subscription Customer Service

More Videos

Popular Stories

Rob Micklus, Chris DellaSala, John McKeown and Bob DellaSala

2026 Manufacturers Rep of the Year: Keystone Sales & Associates

Commercial outlook tech looking at pipes

Commercial Market Outlook: Retrofit Projects Lead the Way

Price Increase Image

PHCP-PVF Price Increases: June 2026

2026 Premier Rankings

Events

December 30, 2030

Webinar Sponsorship Information

For webinar sponsorship information, visit www.bnpevents.com/webinars or email webinars@bnpmedia.com.

View All Submit An Event

Poll

Identifying Daily Time Loss Areas for Your Team

Where does your team lose the most time each day?
View Results Poll Archive

Products

The Water Came To A Stop

The Water Came To A Stop

See More Products

Download the FREE 2025 Water Conservation, Quality & Safety eBook

Download the Fifth annual Bath & Kitchen Pro eBook

Related Articles

  • FloorHeat Systems electric floor heating for renewable energy sources

    See More
  • Cleaning wet returns

    See More
  • Make radiant and hydronic training classes work for you

    See More

Related Products

See More Products
  • MHH4-cover-image-301x400.jpg

    Modern Hydronic Heating and Cooling For Residential and Light Commercial Buildings, 4th Edition

See More Products

Related Directories

  • Falsken Water Systems Inc.

    Home of the Heater Treater line of scale protection for tankless, tank, and solar hot water heaters. Wholesale Line of Quality water treatment systems for residential, commercial and food service applications. Drinking water systems, water softening, chlorine and chloramine-reduction units, lead reduction, filtration, UV, filters, housings, cartridges, consulting/specifying, sizing and correct process determination.
  • Davenport Associates

    We manage product distribution and provide high level sales & marketing for manufacturers that sell directly into the wholesale channel, for manufacturers that prefer a consigned inventory in the territory, and for manufacturers that prefer a buy/sell arrangement. We have a proprietary commercial process that increases market share & profitability for our partners and a large, dynamic sales team throughout New England and Upstate NY. Check out our website to learn more!
  • Associated Marketing Inc.

    Philadelphia based firm that is focused on Results, driven by Passion, performed through Professionalism & Involvement while committed to continual Progress. We work long, hard hours, not only because it’s a requirement – but because it’s what challenges us to be better than our best.
×

Stay in the know on the latest PHCP-PVF industry trends.

Get tailored content delivered your way.

JOIN TODAY!
  • RESOURCES
    • Advertise
    • Contact Us
    • Directories
    • Store
    • Want More
    • Plumbing & Mechanical
  • SIGN UP TODAY
    • Create Account
    • eMagazine
    • Newsletter
    • Customer Service
    • Manage Preferences
  • SERVICES
    • Marketing Services
    • Reprints
    • Market Research
    • List Rental
    • Survey/Respondent Access
  • STAY CONNECTED
    • LinkedIn
    • Facebook
    • Instagram
    • YouTube
    • X (Twitter)
  • PRIVACY
    • PRIVACY POLICY
    • TERMS & CONDITIONS
    • DO NOT SELL MY PERSONAL INFORMATION
    • PRIVACY REQUEST
    • ACCESSIBILITY

Copyright ©2026. All Rights Reserved BNP Media, Inc. and BNP Media II, LLC.

Design, CMS, Hosting & Web Development :: ePublishing